


Before You Stick: Read This!
Most walls are perfect for decals, and every decal's made from a premium fabric material that is kind to walls. Installing is a breeze for some and takes a bit more care for others, either way, we've put this guide together to set you up for the best result, and our team's here to support you every step of the way.
💡 Hot Tip: Keep Your Backing Sheet
Thinking of moving house one day? Hang onto the backing sheet. It's the easiest way to safely remove and transport your decals to a new wall, and you can reposition them again and again without losing any grip
✌️ 1. Check Your Walls
Decals stick best to smooth, painted walls. They won’t hold properly on:
- Textured, bumpy, or popcorn walls (not enough smooth surface to grip)
- Unprimed or flaking surfaces
- Freshly painted walls, give it 45 days for the paint to fully cure first
- Walls repainted without a primer coat between layers, if those layers aren't properly bonded to each other, your decal can lift away along with the top coat
Wash & Wear or Low VOC paint? Most walls are totally fine, but a small number of these paints can affect how well the adhesive grips. A bonding primer from your local hardware store can help if you're at all unsure.
✌️ 2. Wipe Your Walls
This one matters more than it looks! Any dust or grime left behind can stop your decal from sticking properly and cause bubbling underneath. Give the wall a wipe with a clean, damp cloth, then let it dry completely (at least 2 hours) before you start.
✌️ 3. Watch Out for Air Bubbles
Air bubbles are the most common hiccup, but they're totally avoidable. Smooth as you go and push the air out toward the edges as you apply, rather than trying to fix it all at the end. Take it slow and you'll get a clean, bubble free finish.
✌️ 4. Mark Your Placement
Decide where you want the centre of the rainbow to be and make a light Pencil Mark 1 at the base of the wall.
Measure 840mm to the left of Pencil Mark 1 and make another light Pencil Mark 2. This is where the left edge of the rainbow will be positioned.
From Pencil Mark 2, measure 1055mm straight up and mark Pencil Mark 3. This is where you will align the top left corner of Piece A.
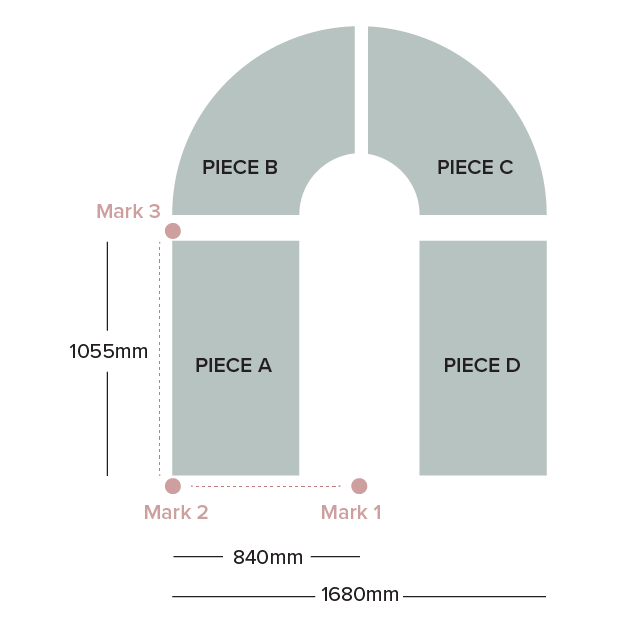
✌️ 5. Apply Piece A – The Left Block:
Peel back 10cm (4 inches) of the backing paper from the top of Piece A down and fold the backing sheet down flat. Do not peel all of the backing paper off!
Align the top left corner of Piece A with Pencil Mark 3 and stick this portion to the wall, making sure it is straight – use a level tool and reposition if needs be. If the top of this piece is skew your entire rainbow will be out of alignment - so take your time here.
Slowly peel away the backing paper as you smooth the decal downwards, ensuring it stays aligned.
If bubbles appear while smoothing down, gently push them outward or carefully lift and reapply.
✌️ 6. Apply Piece B – The Arc:
Peel a small portion of the backing paper from the bottom left of Piece B and align it to the top of Piece A, ensuring the colours match up and align. Working from left to right, slowly smooth Piece B onto the wall, peeling the backing paper as you go.
✌️ 7. Apply Piece C – The Arc:
Peel a small portion of the backing paper from the left of Piece C and align it to the middle of Piece B (and the centre of our rainbow), ensuring the colours match up and align. Working from left to right, slowly smooth Piece B onto the wall, peeling the backing paper as you go.
✌️ 8. Apply Piece D – Right Block:
Align the top of Piece C with the bottom right of Piece B.
Peel back 10cm (4 inches) of the backing paper from the top of Piece A down and fold the backing sheet down flat. Do not peel all of the backing paper off.
Press the decal onto the wall, working downwards and smoothing onto the wall while peeling the backing sheet away.
✌️ 9. Admire & Enjoy:
Step back, admire your work, and enjoy the transformation with the kiddos!
Rainbow looking a bit wonky?
If bubbles appear while smoothing down, gently push them outward or carefully lift and reapply.
Don’t worry! Repositioning is normal and necessary to get your rainbow looking just right. Our decals are removable and reusable, so feel free to adjust them as needed.
VERY IMPORTANT: Be careful not to stretch the fabric material when repositioning. If the fabric stretches, you may struggle to realign the pieces properly, and the design may not fit together as intended.