


Before You Stick: Read This!
✌️ 1. Wipe Your Walls
Skipping this step? Your decals might not stick! Use a clean, damp cloth to remove dust and dirt. Let the surface dry completely before applying your decals (minimum 2 hours to be safe). Avoid household cleaners, as they can leave a residue that may affect the decal’s stickiness.
IMPORTANT: The decal backing is paper and may wrinkle during shipping or application. Don’t worry—it won’t affect the final look once applied.
✌️ 2. Check Your Walls
Decals won’t stick to:
- Unprimed, flaking, or textured walls
- Low VOC or Wash & Wear paints
✌️ 3. Mark Your Placement
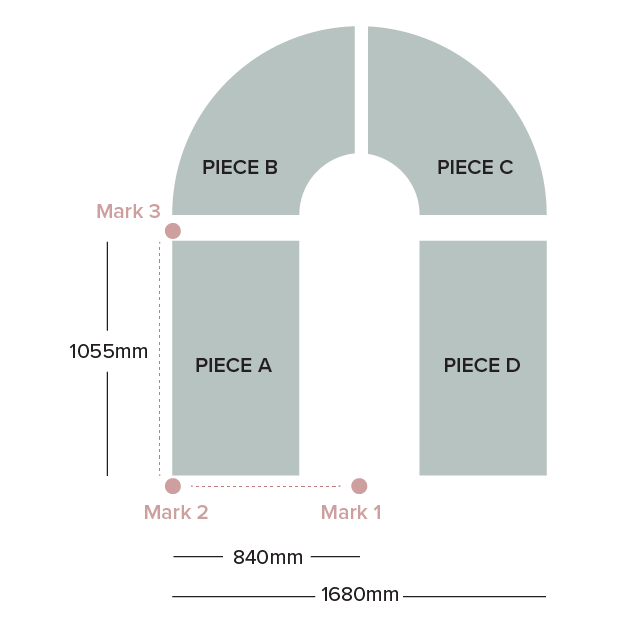
Decide where you want the centre of the rainbow to be and make a light Pencil Mark 1 at the base of the wall.
Measure 840mm to the left of Pencil Mark 1 and make another light Pencil Mark 2. This is where the left edge of the rainbow will be positioned.
From Pencil Mark 2, measure 1055mm straight up and mark Pencil Mark 3. This is where you will align the top left corner of Piece A.
✌️ 4. Apply Piece A – The Left Block:
Peel back 10cm (4 inches) of the backing paper from the top of Piece A down and fold the backing sheet down flat. Do not peel all of the backing paper off!
Align the top left corner of Piece A with Pencil Mark 3 and stick this portion to the wall, making sure it is straight – use a level tool and reposition if needs be. If the top of this piece is skew your entire rainbow will be out of alignment - so take your time here.
Slowly peel away the backing paper as you smooth the decal downwards, ensuring it stays aligned.
If bubbles appear while smoothing down, gently push them outward or carefully lift and reapply.
✌️ 5. Apply Piece B – The Arc:
Peel a small portion of the backing paper from the bottom left of Piece B and align it to the top of Piece A, ensuring the colours match up and align. Working from left to right, slowly smooth Piece B onto the wall, peeling the backing paper as you go.
✌️ 6. Apply Piece C – The Arc:
Peel a small portion of the backing paper from the left of Piece C and align it to the middle of Piece B (and the centre of our rainbow), ensuring the colours match up and align. Working from left to right, slowly smooth Piece B onto the wall, peeling the backing paper as you go.
✌️ 7. Apply Piece D – Right Block:
Align the top of Piece C with the bottom right of Piece B.
Peel back 10cm (4 inches) of the backing paper from the top of Piece A down and fold the backing sheet down flat. Do not peel all of the backing paper off.
Press the decal onto the wall, working downwards and smoothing onto the wall while peeling the backing sheet away.
✌️ 8. Admire & Enjoy:
Step back, admire your work, and enjoy the transformation with the kiddos!
Rainbow looking a bit wonky?
If bubbles appear while smoothing down, gently push them outward or carefully lift and reapply.
Don’t worry! Repositioning is normal and necessary to get your rainbow looking just right. Our decals are removable and reusable, so feel free to adjust them as needed.
VERY IMPORTANT: Be careful not to stretch the fabric material when repositioning. If the fabric stretches, you may struggle to realign the pieces properly, and the design may not fit together as intended.